URL: https://artsandculture.google.com/exhibit/0gIihjYd3lscJQ (Click on the right arrow 3 times to get to the correct page.)
She asked if anyone knew how to fold it and I thought, "That's easy, it's just a twist fold but on the back side." I didn't have time to study it that day, but yesterday I decided to tackle the problem. I tried several folds that I thought would work and they didn't. Then I tried something that seemed similar, but wasn't. Then I desperately tried to find the directions online. There were none. I stared at the image and tried to unfold it in my mind and couldn't quite see it. I decided to take a break and come back to it today after finding a YouTube video that made a similar fold called the square tato.
Long story short, after much trial and error I figured out how to fold the envelope called an Ori-Sue used for holding slips of paper that have scent names written on them. This is used in the Japanese tea ceremony from what I could find out. Maybe you would like to try folding this lovely little envelope.
-Gina
Crease pattern for Ori-Sue fold. Red lines are mountain folds and blue lines are valley folds.
Start with a square piece of paper. Different colors on each side make for a more dramatic final product.
Mark the center of the paper by folding in half and pinching each side. Do not crease. Then fold up one side past the center (so more than 1/4 the paper width) but less than 1/3 the paper width. For example, if your paper is 6 x 6 inches, fold up the side more than 1.5 inches but less than 2 inches.
Left sample has sides folded to 1/4 the length (in other words each side is folded to the center of the paper) and there is no center square. The middle sample has sides folded into thirds and the whole center is the twist triangles with no edges. The sample on the right is what we are trying to make and is folded between 1/4 and 1/3 the paper width.
Fold in the corners creasing very lightly to mark the square. Fold up the two sides to the point where the diagonal meets the edge of the paper. This will give you the same width as the first fold without having to measure.
If you have done things properly the two sides should overlap each other, but not meet at the folded edge.
Rotate the paper 90 degrees. Again fold the corners in lightly to meet the straight fold and mark on the paper's edge. Fold the last edge up to this diagonal mark. Now all for sides are folded. You have a square in the center of the paper and four squares at the corners. Crucially, you have rectangles between the corner squares on the four sides of the paper.
Next you will fold each side up and fold in the left side corner to meet the vertical line as shown above. Repeat on all four sides, only folding the left corner up. Fold the corner to the back of the paper as well to make the last step easier.
Your paper should now have all of these folds (minus the red and blue lines). It's time to collapse.
To collapse the model, fold up one side then fold back along the diagonal on the right side. Fold in the corner and turn the model 90 degrees counterclockwise.
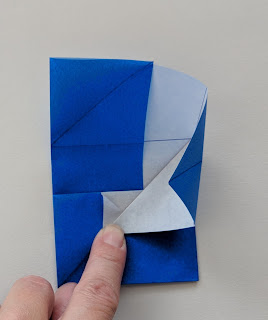
Fold up the second section the same way, folding in the side then the corner. The center square starts to take shape.
Fold in the third side the same way then open up the first side at the top left corner to tuck in the last corner mountain then valley folds.
Pinwheel the four sides overlapping them to form the final shape.
Here is the final model. You can make the square of contrasting color bigger or smaller depending on how close to 1/4 or 1/3 you fold the first side of the paper. Play around and see which size you like best.


